
(888) 465-3311

ACCESSORIES
Call us for More Information - (888) 465-3311
Click on Image to Enlarge
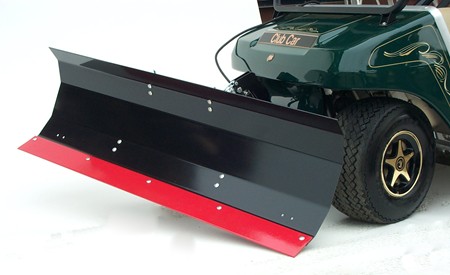
SnowBlade Accessories


TGSUV1B $ 495
$ 495
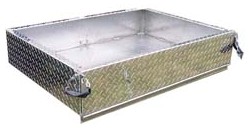
BUYER PRODUCTS UNIVERSAL RECEIVER-MOUNT SALT SPREADER -- 22-1/2 x 40-1/2 x 20-1/2 in.; 300 lbs. capacity; Includes 18-ft. power cord, all mounting hardware, and cigarette plug adapter; Features adjustable spread path designed for one-pass coverage of driveways and access roads, in-cab on and off controls, black thermoplastic hopper and orange powdercoated steel mounting frame, and sealed heavy-duty 12-volt spreader motor; Spreads salt smoothly and evenly without the need for an expensive auger add-on or vibration kits; Mounts securely into your 1-1/4 or 2 in. receiver; Powered by 12V cigarette lighter or 12V plug-in
This spreader is ideal for residential applications. The adjustable spread path is designed for one-pass coverage of driveways and access roads. It features an attractive and rugged black polymer hopper and orange powder coated steel mounting frame. Equipped with a fold-away feature—simply release hitch pin & spreader folds away for easy access to rear door or tailgate.
- Heavy-duty 12-volt spreader motor is housed in a sealed motor chamber. Includes cigarette plug adapter.
- Material flow from 12' to 14' controlled from a manual, stainless steel open/close gate, and an in-cab on–off control.
- Ultra-smooth hopper interior allows material to flow through the gate, to the stainless steel-lined hopper throat and spinner, providing an even flow of material.
- Material gate, on/off control
Click here to add text.
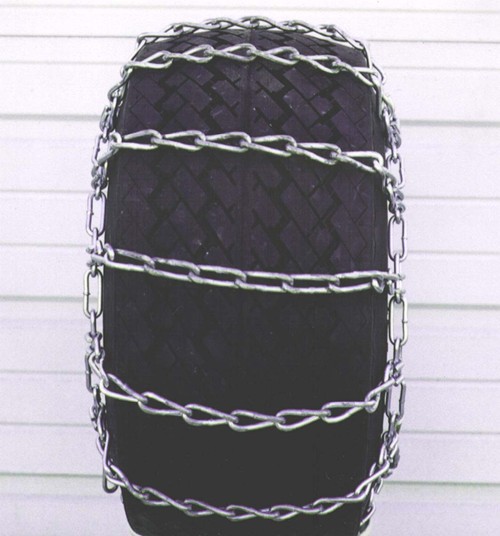
GOLF CAR TIRE CHAIN INSTALLATION
You probably need to install tire chains if you are planning to operate in slippery conditions. Most turf tires do not have enough traction to operate in slippery conditions.
Getting started
Safety is always the #1 priority. Please follow the steps listed below.
- Work on a level surface
- Ensure your equipment is secure, use blocks if needed
- If possible, install your tire chains in a warm place
- Removing the tires or wheel assemblies is optional. It can increase the chance of losing parts (such as axel keys and e-clips), but may make it easier to install the chains properly. You can also lift the rear of the vehicle to make installation easier.
- Chains get tangled in the box. Remove the chains from the box and untangle the chains from each other and themselves.
- Lay the chains out on the floor. Take a moment to identify all the parts of the tire chain. Notice that they have a regular hook on one side and a lever fastener on the other side. The regular hook goes on the inside closest to the transmission. The lever fastener goes on the outside.
- There is also a "right side up." The opening in the hooks for the cross links always faces away from the rubber tire.
Installation Instructions
- Drape chain over the tire. Make sure the open side of the hooks for the cross links is away from the rubber tire. The regular hooks should be on the inside. The lever fastener should be on the outside.
- Try to center the chain on the tread of the tire as close as possible. Make sure the cross chains are straight across the face of the tire tread.
- Hook the regular hook on the inside to a link on the other side of the chain. Use the tightest link possible without moving the chain from its centered position on the tread.
- On the outside of the tire, hook the lever fastener through an open link on the free end of the rim chain. Make sure the extra links do not interfere with the lever.
- Next, fold the lever fastener back 180 degrees. If the lever won't fold back all the way, try one link longer. If the lever folds easily, try one link shorter.
- Hook the end through the link on the rim chain.
- Check the chain tension. When the tension is correct it will be difficult to fit a finger between the tire and any of the chain links. If the chains are not tight, release the lever fastener in a position one link shorter. If it is difficult to reach the shorter links, check for the cross links that may be caught in the tire treads. Reposition the cross links so they are all as parallel to each other as possible, then try to hook the next shortest links. It may take several tries to get the correct tension on the chains.
- Reinstall wheel and tire assemblies or let the vehicle down, if necessary.
- Test drive chains by driving the tractor about 40 feet. Recheck the chain tension. Tighten if loose. The chains must be snug against the tires. If left too loose they will fall off during operation.
- Use wire or a nylon zip tie to secure any excess rim links. This will prevent damage to the tractor fender or transmission case.
Q: Can I deflate the tires to make the chain installation easier?
A: Yes, but it is normally not necessary. Deflating the tires adds another step to the process and only helps marginally. Also, it is easy to accidentally break the seal on the bead of the tire when the tires are deflated, making re-inflation without special equipment difficult.